Tutorial 5 of Chapter 7 (Understanding ActionScript 3.0) from Adobe Flash CS6 book:
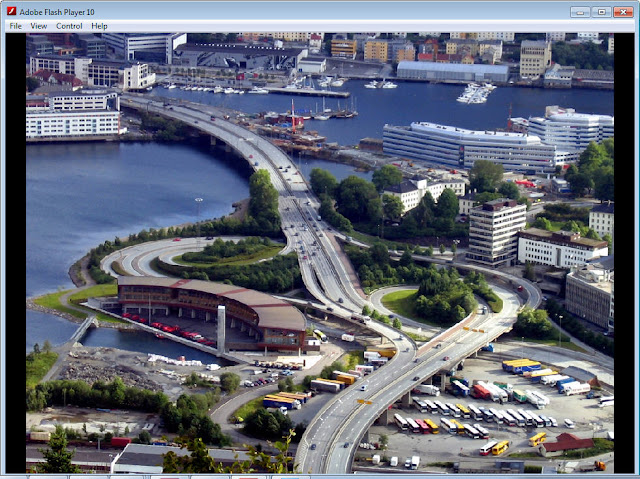
In this tutorial, you will create an XML photo gallery, refer to Figure 1.
4. Open the Notepad application.
<image>
<imgURL>1.jpg</imgURL>
<imgW>1024</imgW>
<imgH>768</imgH>
</image>
<image>
<imgURL>2.jpg</imgURL>
<imgW>1024</imgW>
<imgH>768
</imgH>
</image>
<image>
<imgURL>3.jpg</imgURL>
<imgW>1024</imgW>
<imgH>768</imgH>
</image>
<image>
<imgURL>4.jpg</imgURL>
<imgW>1024</imgW>
<imgH>768</imgH>
</image>
<image>
<imgURL>5.jpg</imgURL>
<imgW>1024</imgW>
<imgH>768</imgH>
</image>
</imageFolder>
6. Save this file with the file name imagegallery.xml.
7. Create a new document in Flash. Rename Layer 1 as background. Set the size of the Stage to 1024 (width) and 768 (height). Set the color of the Stage to black.
8. Create a rectangle in the Stage. Set the color of the rectangle (stroke and fill color) to black.
9. Convert this rectangle into a movie clip symbol with the name imagebox and make sure to select the top left square of the Registration grid.
10. Align the imagebox instance exactly in the Stage.
11. Create a new layer above the background layer and rename it to actions.
12. Select frame 1 and press the F9 key to display the Actions panel.
1 var xmlReq:URLRequest = new URLRequest(“imagegallery.xml”);
2 var xmlLoad:URLLoader = new URLLoader (xmlReq);
3 var Data:XML;
4 var imageLoad:Loader;
5 var Image:String;
6 var imgH:String;
7 var imgW:String;
8
9 var imageNum:Number = 0;
10 var Time:Timer = new Timer(100);
11 var Childnumber:Number;
12
13 xmlLoad.addEventListener(Event.COMPLETE, xmlLoadedF);
14 imagebox.addEventListener(MouseEvent.CLICK, nextImgF);
15 imagebox.buttonMode = true;
16
17 function xmlLoadedF(event:Event):void{
18 Time.start();
19 Time.addEventListener(TimerEvent.TIMER, checkF);
20 Data = new XML(event.target.data);
21 }
22
23 function checkF(event:TimerEvent):void{
24 if(imageNum ==0){
25 packetF();
26 }else if(imageNum < Childnumber){
27 imageLoad.unload();
28 packetF();
29 }else{
30 imageLoad.unload();
31 imageNum = 0;
32 packetF();
33 }
34 }
35
36 function packetF():void{
37 Time.removeEventListener(TimerEvent.TIMER, checkF);
38 Image = Data.image[imageNum].imgURL;
39 Childnumber = Data.*.length();
40 imgW = Data.image[imageNum].imgW;
41 imgH = Data.image[imageNum].imgH;
42 imageLoad = new Loader;
43 imageLoad.load(new URLRequest(Image));
44 imagebox.addChild(imageLoad);
45 imageLoad.x = (stage.stageWidth - Number(imgW)) /2;
46 imageLoad.y = (stage.stageHeight - Number(imgH))/2;
47
48 }
49
50 function nextImgF(event:MouseEvent):void{
51 Time.addEventListener(TimerEvent.TIMER, checkF);
52 imageNum++;
53 }
13. Save the flash file.
14. Press CTRL+ENTER to view the final output of the tutorial in the preview window. Note that in this window, the first image is displayed. Next, click on image to display the next image.
Note: Make sure that you save all the resources (images, Flash file, and xml file) of this tutorial in the same directory.
In this tutorial, you will create an XML photo gallery, refer to Figure 1.
 |
| Figure 1 |
The following steps are required to complete this tutorial:
1. Download the images used in this tutorial from the links listed below.
http://www.rgbstock.com/download/Ayla87/mQWjM9i.jpg http://www.rgbstock.com/download/Ayla87/mfjLs5O.jpg http://www.rgbstock.com/download/Ayla87/n1uUf1K.jpg http://www.rgbstock.com/download/Ayla87/ndoDJIC.jpg
http://www.sxc.hu/photo/337328
2. Save them with the names; 1.jpg, 2.jpg, 3.jpg, 4.jpg, and 5.jpg.
3. Using Photoshop application set the width and height of all the images to 1024 and 768.
4. Open the Notepad application.
5. In Notepad, type the following codes:
<?xml version=”1.0” encoding=@utf-8”?>
<imageFolder><image>
<imgURL>1.jpg</imgURL>
<imgW>1024</imgW>
<imgH>768</imgH>
</image>
<image>
<imgURL>2.jpg</imgURL>
<imgW>1024</imgW>
<imgH>768
</imgH>
</image>
<image>
<imgURL>3.jpg</imgURL>
<imgW>1024</imgW>
<imgH>768</imgH>
</image>
<image>
<imgURL>4.jpg</imgURL>
<imgW>1024</imgW>
<imgH>768</imgH>
</image>
<image>
<imgURL>5.jpg</imgURL>
<imgW>1024</imgW>
<imgH>768</imgH>
</image>
</imageFolder>
6. Save this file with the file name imagegallery.xml.
7. Create a new document in Flash. Rename Layer 1 as background. Set the size of the Stage to 1024 (width) and 768 (height). Set the color of the Stage to black.
8. Create a rectangle in the Stage. Set the color of the rectangle (stroke and fill color) to black.
9. Convert this rectangle into a movie clip symbol with the name imagebox and make sure to select the top left square of the Registration grid.
10. Align the imagebox instance exactly in the Stage.
11. Create a new layer above the background layer and rename it to actions.
12. Select frame 1 and press the F9 key to display the Actions panel.
1 var xmlReq:URLRequest = new URLRequest(“imagegallery.xml”);
2 var xmlLoad:URLLoader = new URLLoader (xmlReq);
3 var Data:XML;
4 var imageLoad:Loader;
5 var Image:String;
6 var imgH:String;
7 var imgW:String;
8
9 var imageNum:Number = 0;
10 var Time:Timer = new Timer(100);
11 var Childnumber:Number;
12
13 xmlLoad.addEventListener(Event.COMPLETE, xmlLoadedF);
14 imagebox.addEventListener(MouseEvent.CLICK, nextImgF);
15 imagebox.buttonMode = true;
16
17 function xmlLoadedF(event:Event):void{
18 Time.start();
19 Time.addEventListener(TimerEvent.TIMER, checkF);
20 Data = new XML(event.target.data);
21 }
22
23 function checkF(event:TimerEvent):void{
24 if(imageNum ==0){
25 packetF();
26 }else if(imageNum < Childnumber){
27 imageLoad.unload();
28 packetF();
29 }else{
30 imageLoad.unload();
31 imageNum = 0;
32 packetF();
33 }
34 }
35
36 function packetF():void{
37 Time.removeEventListener(TimerEvent.TIMER, checkF);
38 Image = Data.image[imageNum].imgURL;
39 Childnumber = Data.*.length();
40 imgW = Data.image[imageNum].imgW;
41 imgH = Data.image[imageNum].imgH;
42 imageLoad = new Loader;
43 imageLoad.load(new URLRequest(Image));
44 imagebox.addChild(imageLoad);
45 imageLoad.x = (stage.stageWidth - Number(imgW)) /2;
46 imageLoad.y = (stage.stageHeight - Number(imgH))/2;
47
48 }
49
50 function nextImgF(event:MouseEvent):void{
51 Time.addEventListener(TimerEvent.TIMER, checkF);
52 imageNum++;
53 }
13. Save the flash file.
14. Press CTRL+ENTER to view the final output of the tutorial in the preview window. Note that in this window, the first image is displayed. Next, click on image to display the next image.
Note: Make sure that you save all the resources (images, Flash file, and xml file) of this tutorial in the same directory.
No comments:
Post a Comment